14/04/2014

PHP Source Code Chunks of Insanity (Logins Pages) Part 1

Intro 

This post is going to talk about source code reviewing PHP and demonstrate how a relatively small chunk of code can cause you lots of problems.

The Code

In this article we are going to analyze the code displayed below. The code displayed below might seem innocent for some , but obviously is not. We are going to assume that is used by some web site to validate the credentials and allow the users to login.

 <?php  
     require_once 'commonFunctionality.php';  
        if (validateCredentials($someUsername, $somePassword)) {  
           header('Location: myIndex.php'); }  
        else {  
           header('Location: wrong_login.php'); }  
 ?>  

If you look carefully the code you will se that the code is vulnerable to the following issues:
  1. Reflected/Stored XSS
  2. Session Fixation/Session Hijacking 
  3. Lock Out Mechanism Not In Place
Think this is not accurate , think better.

Session Fixation/Session Hijacking

An adversary may on purpose exploit this vulnerability without the need of developing any costume tools (e.g. the session gets exposed in a blog post or within the same application or is passed in the http referrer and gets cached in a Web Proxy controlled by an adversary). Also this attack might be used to abuse user privileges (e.g. escalate privileges of one user by manipulating the session identifier, perform vertical and horizontal privilege escalation etc.). It should be noted at this point that the issues described above are possible only if the web application makes decisions based only on the session identifier.

Vulnerable Code:
session_unset(); // Improper handling of the session.  

Explanation:

The function shown above does not properly handle the session. The session_unset function just clears the $_SESSION variable. It’s equivalent to doing $_SESSION = array(); So this does only affect the local $_SESSION variable instance, but not the session data in the session storage, everything else remains unchanged, including the session identifier. In this occasion the session_unset is used to clear the session from user information, instead of the session_destroy function in the login page (instead of the logout page), which translates into not logging out properly the previous user (e.g. the next user will possibly again access to the account of the previous user).The Web Application makes decisions without evaluating other cookie parameters to give access to Web Resources (e.g. the decision making process is the username, a variable called logged_in and the session id). Ideally this should partly be fixed by using also another variable e.g. $_SESSION[‘logged_in’] = true (see code below). 

Exploitation:

An adversary may on purpose exploit this vulnerability without the need of developing any costume tools (e.g. the session gets exposed in a blog post or within the same application or is passed in the http referrer and gets cached in a Web Proxy controlled by an adversary). Also this attack might be used to abuse user privileges (e.g. escalate privileges of one user by manipulating the session identifier, perform vertical and horizontal privilege escalation etc.). It should be noted at this point that the issues described above are possible only if the web application makes decisions based only on the session identifier.

Business Impact:

The possibility of this vulnerability going public (e.g. blog posts start appearing in the internet revealing the issue) would cause severe costumer reputation and revenue loss; this vulnerability allows an adversary to potentially launch personalized phishing attacks (e.g. deceive a user in clicking a link with a fixed session etc.) abuse web application user privileges and possibly allow phishing campaigns. 

Remedial Code: 
 function init_session() { ...  
 session_start(); // Start the php session  
 session_regenerate_id(true); // regenerated the session, delete the old one. $_SESSION['logged_in'] = true;  
 ... }  
Regenerate the session ID anytime the session's status changes. That means any of the following:
  1. User authentication (e.g. in the login page, other multiple authentication stages etc.).
  2. Storing privilege level information in the session (e.g. temporary random variables, valid only
    for the current session etc.)
  3. Regenerate the session identifier whenever the user's privilege level changes. 
Lock Out Mechanism Not In Place

An adversary may on purpose exploit this vulnerability without the need of developing any costume tools (e.g. make use of Burp Intruder or Hydra to perform online password cracking attacks etc.).

Vulnerable Code:

 $username = $_POST['username']; $password = $_POST['password'];  
Note: The Web Application should implement server side controls in the login page to prevent password brute forcing attacks.

Remedial Code:


 function lockout($username, $password) { $now = time();  
 $counter = 0  
 if (validateCredentials){  
 $counter = $counter+1// Save that in database, retrieve login attempt times and compare the  
 times ...  
 } }  

The Web Application should take the following actions to prevent online dictionary attacks:
  1. Make use of login attempt counters (e.g. allow 3 failed attempts within 30 minutes).
  2. Associate the user IP with the session (e.g. generate proper audit trails to later on ban that ip).
    Include the user's IP address from $_SERVER['REMOTE_ADDR'] in the session. Store it in
    $_SESSION['remote_ip'].
  3. Run integrity checks of the session (although this functionality might be included in another
    function).
  4. Include the user agent from $_SERVER['HTTP_USER_AGENT'] in the session. Store it in a session
    variable $_SESSION['user_agent']. Then, on each subsequent request check that it matches (Note: The user agent can be very easily spoofed). 
Note: It should also be noted that since the session parameters are also populated with sensitive information such as the username, further actions should be performed to remove all this information (e.g. replace username with temporary user-­‐id). Gaining access to the username can significantly reduce a brute-­‐force login attempt. 

Reflected/Stored XSS

An adversary can exploit this vulnerability without the need of developing any costume tools. Point and click tools are available in the Internet and might be used to exploit this vulnerability (e.g. Social Engineering Tool etc.). Further escalating on the issue an adversary might use this attack to compromise multiple company sites (e.g. make use of it as an XSS proxy).

Note: This might also lead into unrestricted redirection attacks. Due to limited amount of time in my disposal no further investigation was conducted (e.g. load the login page to an Apache as and see if the variable username is passed the URL or the location header field.) 

Vulnerable Code:
 $_SESSION['username'] = $username;  

Note: Even though we don’t have access to the rest of the Web App code, it is highly likely that the username value might be displayed back to the user and the Http header fields. 

Remedial Code: 

Provide Server Side filters for the vulnerability. Make use of regular expressions and html encode the variables whether displayed back to the user or not (for providing security in depth and making sure that the Set-­‐Cookie header field or other fields cannot be abused).

1st Layer of defense

 $username = preg_match ("/[^a-­‐zA-­‐Z0-­‐9_\-­‐]+/", "", $username)  

Note: Ideally the username should be replaced with a temporary user id (preferable random that expires along with the cookie session). Using regular expressions to replace parts of the input and proceed with further processing the input is not recommended, once a malicious input is identified should be rejected (e.g. using preg_replace instead of preg_match). Also note that this functionality should ideally be also part of the validateCredentials function or the input should be processed before used by the validateCredentials function. 

2nd Layer of defense


1. // This function will convert both double and single quotes. 
2. htmlentities($username , ENT_QUOTES);  

Input: 
 <script>alert(1)</script>   

Output:
 &#x3c;&#x73;&#x63;&#x72;&#x69;&#x70;&#x74;&#x3e;&#x61;&#x6c;&#x65;&#x72;&#x7 4;&#x28;&#x31;&#x29;&#x3c;&#x2f;&#x73;&#x63;&#x72;&#x69;&#x70;&#x74;&#x3e;  


Note: With htmlentities, all characters which have HTML character entity equivalents are translated into these entities (displayed above). 

References:

  1. https://www.owasp.org/index.php/Account_lockout_attack
  2. http://stackoverflow.com/questions/17217777/difference-­‐between-­‐unset-­‐and-­‐session-­‐unset-­‐ in-­‐php
  3. http://shiflett.org/articles/session-­‐fixation
  4. http://shiflett.org/articles/session-­‐hijacking 

06/04/2014

Clickalicious Candies...

Introduction

This articles is written by me to show that Clickjaking should not be underestimated as a vulnerability, especially when combined with other vulnerabilities. Clickjaking (User Interface redress attack) is a malicious technique of tricking a Web user into clicking on something different from what the user perceives they are clicking on, thus potentially revealing confidential information or taking control of their computer while clicking on seemingly innocuous web pages. That is good in theory , but how can someone do that in practice? The answer is simple , ridiculously easy...


Even a script kiddy can become a "hacker" con-artist when combining  vulnerabilities. In this post I am going to show how a simple CSRF attack can actually be combined with a clickjaking attack, of course the same think can happen with vulnerabilities such as session fixation and XSS.

The Clickalicious Attack

In order to perform the attack we would have to be based in the following assumptions:
  1. We identified a website that is vulnerable to Clickjaking (e.g. is missing the X-Frame-Options) .
  2. The same Web Site is also vulnerable to CSRF (e.g. the CSRF is a simple html form). 
  3. The CSRF attack exploits a vulnerability that a malicious user can actually submit the form with polluted hidden form fields (for simplicity I am going to use a simple html form for the demo).   
Step 1: Frame the vulnerable web site to our iframe, in our example I am going to use www.w3sschools.com (such a lovely site).

 <iframe src="http://www.w3schools.com"></iframe>  

The visual outcome of this code wold be:


Note: The picture above displays only the iframe and not the whole page. In this particular example the html page was loaded from my hard disk.

Step 2: Project the CSRF to the vulnerable web site within the iframe created in Step 1. The simple source code to do that would be:

 <html>  
 <body>  
 <head>  
 <style>  
 form  
 {  
 position:absolute;  
 left:30px;  
 top:100px;  
 }  
 </style>  
 </head>  
 <form>  
 First name: <input type="text" name="firstname"><br>  
 Last name: <input type="text" name="lastname">  
 </form>  
 <iframe src="http://www.w3schools.com"></iframe>  
 </body>  
 </html>  

See the CSS absolute element? The CSS 2.1 defines three positioning schemes:
  1. Normal flow
  2. Absolute positioning
  3. Position: top, bottom, left, and right
Out of these three CSS features we are interested in the Absolute positioning feature. An absolutely positioned feature has no place in, and no effect on, the normal flow of other items. It occupies its assigned position in its container independently of other items.The visual outcome of this code wold be:


Note: The same exploit can be build using a stored XSS. The only difference would be that you would have to project the vulnerable CSRF within the space controlled by the XSS (without taking advantage of a Clickjaking vulnerability).

Tools such as NoScript would be able to detect the Clickjaking attack:


Note: See the icon stating that the script was blocked.

Epiloge

Next time you run a penetration test , think again before you characterize a Clickjaking as low!! especially if it is a login page. And be aware of the Script Kiddies.


The moto of this article is going to be think before you click...

References:
  1. http://www.w3schools.com/cssref/pr_class_position.asp 
  2. http://en.wikipedia.org/wiki/Cascading_Style_Sheets#Positioning

21/09/2013

The Hackers Guide To Dismantling IPhone (Part 3)

Introduction

On May 7, 2013, as a German court ruled that the iPhone maker must alter its company policies for handling customer data, since these policies have been shown to violate Germany’s privacy laws.

The news first hit the Web via Bloomberg, who reports that:

"Apple Inc. (AAPL), already facing a U.S. privacy lawsuit over its information-sharing practices, was told by a German court to change its rules for handling customer data.
A Berlin court struck down eight of 15 provisions in Apple’s general data-use terms because they deviate too much from German laws, a consumer group said in a statement on its website today. The court said Apple can’t ask for “global consent” to use customer data or use information on the locations of customers.
While Apple previously requested “global consent” to use customer data, German law requires that customers know in detail exactly what is being requested. Further to this, Apple may no longer ask for permission to access the names, addresses, and phone numbers of users’ contacts."

Finally, the court also prohibited Apple from supplying such data to companies which use the information for advertising. But why does this happen?

More Technical on privacy issues


Every iPhone has an associated unique device Identifier derived from a set of hardware attributes called UDID. UDID is burned into the device and one cannot remove or change it. However, it can be spoofed with the help of tools like UDID Faker.

UDID of the latest iPhone is computed with the formula given below:

UDID = SHA1(Serial Number + ECID + LOWERCASE (WiFi Address) + LOWERCASE(Bluetooth Address))

UDID is exposed to application developers through an API which would allow them to access the UDID of an iPhone without requiring the device owner’s permission. The code snippet shown below is used to collect the UDID of a device, later which can used to track the user’s behavior.

NSString *uniqueIdentifier = [device uniqueIdentifier]

With the help of UDID, it is possible to observe the user’s browsing patterns and trace out the user’s geo location. As it is possible to locate the user’s exact location with the help of a device UDID, it became a big privacy concern. More possible attacks are documented in Eric Smith-iPhone application privacy issues whitepaper. Eric’s research shows that 68% of applications silently send UDIDs to the servers on the internet. A perfect example of a serious privacy security breach is social gaming network Openfient.

OpenFeint was a social platform for mobile games Android and iOS. It was developed by Aurora Feint, a company named after a video game by the same developers. The platform consisted of an SDK for use by games, allowing its various social networking features to be integrated into the game's functionality. OpenFeint was discontinued at the end of 2012.

Openfient collected device UDID’s and misused them by linking it to real world user identities (like email address, geo locations latitude & longitude, Facebook profile picture) and making them available for public access, resulting in a serious privacy breach.

While penetration testing, observe the network traffic for UDID transmission. UDID in the network traffic indicates that the application is collecting the device identifier or might be sending it to a third party analytic company to track the user’s behavior. In iOS 5, Apple has deprecated the API that gives access to the UDID, and it will probably remove the API completely in future iOS releases. Development best practice is not to use the API that collects the device UDIDs, as it breaches the privacy of the user. If the developers want to keep track of the user’s behaviour, create a unique identifier specific to the application instead of using UDID. The disadvantage with the application specific identifier is that it only identifies an installation instance of the application, and it does not identify the device.

Apart from UDID, applications may transmit personal identifiable information like age, name, address and location details to third party analytic companies. Transmitting personal identifiable information to third party companies without the user’s knowledge also violates the user’s privacy. So, during penetration testing carefully observe the network traffic for the transmission of any important data.
Example: Pandora application was used to transmit user’s age and zip code to a third party analytic company (doubleclick.net) in clear text. For the applications which require the user’s geo location (ex: check-in services) to serve the content, it is always recommended to use the least degree of accuracy necessary. This can be achieved with the help of accuracy constants defined in core location framework (ex: CLLocationAccuracy kCLLocationAccuracyNearestTenMeters).

Identifying UUID transmission

Identifying if the UUID of the Iphone is transmitted is easy. It can be done through a Man In The Middle attack or a sniffer such as Wireshark. For example by using Wireshark to sniff traffic you can very easily identify if the UUID is transmitted if you follow the tcp stream.

Local data storage security issues

IPhone stores the data locally on the device to maintain essential information across the application execution or for a better performance or offline access. Also, developers use the local device storage to store information such as user preferences and application configurations. As device  theft is becoming an increasing concern, especially in the enterprise, insecure local storage is considered to be the top risk in mobile application threats.  A recent survey conducted by Viaforensics revealed that 76 percent of mobile applications are storing user’s information on the device. 10 percent of them are 
even storing the plain text passwords on the phone.

Sensitive information stored on the iPhone can be obtained by attackers in several ways. A few of the ways are listed below -

From Backups

When an iPhone is connected to iTunes, iTunes automatically takes a backup of everything on the device. Upon backup, sensitive files will also end up on the workstation. So an attacker who gets access to the workstation can read the sensitive information from the stored backup files.

More specifically backed-up information includes purchased music, TV shows, apps, and books; photos and video in the Camera Roll; device settings (for example, Phone Favorites, Wallpaper, and Mail, Contacts, Calendar accounts); app data; Home screen and app organization; Messages (iMessage, SMS, and MMS), ringtones, and more. Media files synced from your computer aren’t backed up, but can be restored by syncing with iTunes.

iCloud automatically backs up the most important data on your device using iOS 5 or later. After you have enabled Backup on your iPhone, iPad, or iPod touch in Settings > iCloud > Backup & Storage, it will run on a daily basis as long as your device is:

  • Connected to the Internet over Wi-Fi
  • Connected to a power source
  • Screen locked

Note:You can also back up manually whenever your device is connected to the Internet over Wi-Fi by choosing Back Up Now from Settings > iCloud > Storage & Backup.

Physical access to the device

People lose their phones and phones get stolen very easily. In both cases, an attacker will get physical access to the device and read the sensitive information stored on the phone. The passcode set to the device will not protect the information as it is possible to brute force the iPhone simple passcode within 20 minutes. To know more details about iPhone passcode bypass go through the iPhone Forensics article available at – http://resources.infosecinstitute.com/iphone-forensics/.

Malware

Leveraging a security weakness in iOS may allow an attacker to design a malware which can steal the files on the iPhone remotely. Practical attacks are demonstrated by Eric Monti in his presentation on iPhone Rootkit.

Directory structure

In iOS, applications are treated as a bundle represented within a directory. The bundle groups all the application resources, binaries and other related files into a directory. In iPhone, applications are executed within a jailed environment (sandbox or seatbelt) with mobile user privileges. Unlike Android UID based segregation, iOS applications runs as one user. Apple says “The sandbox is a set of fine-grained controls limiting an application’s access to files, preferences, network resources, hardware, and so on. Each application has access to the contents of its own sandbox but cannot access other applications’ sandboxes. When an application is first installed on a device, the system creates the application’s home directory, sets up some key subdirectories, and sets up the security privileges for the sandbox“. A sandbox is a restricted environment that prevents applications from accessing unauthorized resources; however, upon iPhone JailBreak, sandbox protection gets disabled.

When an application is installed on the iPhone, it creates a directory with a unique identifier under /var/mobile/Applications directory. Everything that is required for an application to execute will be contained in the created home directory. Typical iPhone application home directory structure is listed below.


Plist files

A property List (Plist file) is a structured binary formatted file which contains the essential configuration of a bundle executable in nested key value pairs. Plist files are used to store the user preferences and the configuration information of an application. For example, Gaming applications usually store game
levels and game scores in the Plist files. In general, applications store the Plist files under [Application's Home Directory]/documents/preferences folder. Plist can either be in XML format or in binary format.

As XML files are not the most efficient means of storage, most of the applications use binary formatted Plist files. Binary formatted data stored in the Plist files can be easily viewed or modified using Plist editors (ex: plutil). Plist editors convert the binary formatted data into an XML formatted data, later it can be edited easily. Plist files are primarily designed to store the user preferences & application configuration; however, the applications may use Plist files to store clear text usernames, passwords and session related information.

ICanLocalize

ICanLocalize allows online translating plist files as part of a Software Localization project. A parser will go through the plist file. It will extract all the texts that need translation and make them available to the translators. Translators will translate only the texts, without worrying about the file format.

When translation is complete, the new plist file is created. It has the exact same structure as the original file and only the right fields translated.

For example, have a look at this plist file:

<?xml version="1.0" encoding="UTF-8"?>
<!DOCTYPE plist PUBLIC "-//Apple Computer//DTD PLIST 1.0//EN"
    "http://www.apple.com/DTDs/PropertyList-1.0.dtd">
<plist version="1.0">
  <dict>
  <key>Year Of Birth</key>
  <integer>1965</integer>
  <key>Photo</key>
  <data>
    PEKBpYGlmYFCPAfekjf39495265Afgfg0052fj81DG==
  </data>
  <key>Hobby</key>
  <string>Swimming</string>
  <key>Jobs</key>
  <array>
    <string>Software engineer</string>
    <string>Salesperson</string>
  </array>
  </dict>
</plist>

Note: It includes several keys and values. There’s a binary Photo entry, an integer field calls Year of Birth and text fields called Hobby and Jobs (which is an array). If we translate this plist manually, we need to carefully watch out for strings we should translate and others that we must not translate.

Of this entire file, we need to translate only the items that appear inside the <string> tags. Other texts must remain unchanged.

Translating as plist info

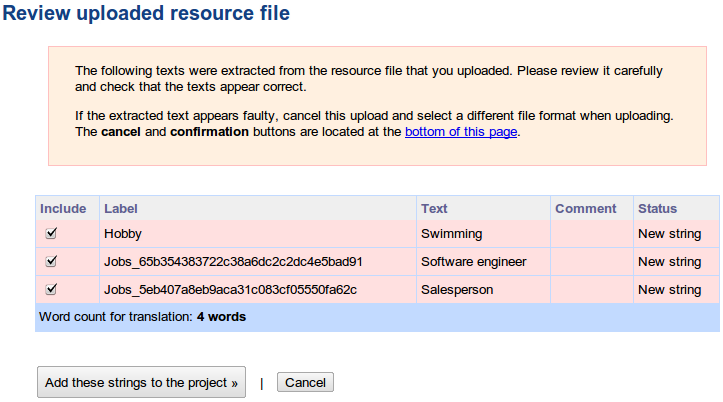
Once you’re logged in to ICanLocalize, click on Translation Projects -> Software Localization and create a new project.

Name it and give a quick description. You don’t need to tell about the format of plist files. Our system knows how to handle it. Instead, explain about what the plist file is used for. Tell about your application, target audience and the preferred writing style. Then, upload the plist file. You will see a list of texts which the parser extracted.


Note: Manipulating and altering the plist files can be done through the iExplorer. Simple download iExplorer open plist files, modify them and then insert them back again.

Keychain Storage 

Keychain is an encrypted container (128 bit AES algorithm) and a centralized SQLite database that holds identities & passwords for multiple applications and network services, with restricted access rights. On the iPhone, keychain SQLite database is used to store the small amounts of sensitive data like usernames, passwords, encryption keys, certificates and private keys. In general, iOS applications store the user’s credentials in the keychain to provide transparent authentication and to not prompt the user every time for login.

iOS applications use the keychain service library/API:

  • secItemAdd
  • secItemDelete
  • secItemCopyMatching & secItemUpdate methods

Note: These keywords can be used for source code reviews (identifying the location of the data)

These keywords are used to read and write data to and from the keychain. Developers leverage the keychain services API to dictate the operating system to store sensitive data securely on their behalf, instead of storing them in a property list file or a plaintext configuration file. On the iPhone, the keychain SQLite database file is located at – /private/var/Keychains/keychain-2.db.

Keychain contains a number of keychain items and each keychain item will have encrypted data and a set of unencrypted attributes that describes it. Attributes associated with a keychain item depend on the keychain item class (kSecClass). In iOS, keychain items are classified into 5 classes – generic passwords (kSecClassGenericPassword), internet passwords (kSecClassInternetPassword), certificates (kSecClassCertificate), keys (kSecClassKey) and digital identities (kSecClassIdentity, identity=certificate + key). In the iOS keychain, all the keychain items are stored in 4 tables – genp, inet, cert and keys (shown in Figure 1). Genp table contains generic password keychain items, inet table contains Internet password keychain items, and cert & keys tables contain certificates, keys and digital identity keychain items.

Keys hierarchy

Here is the keychain stracture:

  • UID key : hardware key embedded in the application processor AES engine, unique for each device. This key can be used but not read by the CPU. Can be used from bootloader and kernel mode. Can also be used from userland by patching IOAESAccelerator.
  • UIDPlus key : new hardware key referenced by the iOS 5 kernel, does not seem to be available yet, even on newer A5 devices.
  • Key 0x835 : Computed at boot time by the kernel. Only used for keychain encryption in iOS 3 and below. Used as "device key" that protects class keys in iOS 4.
  • key835 = AES(UID, bytes("01010101010101010101010101010101"))
  • Key 0x89B : Computed at boot time by the kernel. Used to encrypt the data partition key stored on Flash memory. Prevents reading the data partition key directly from the NAND chips.
  • key89B = AES(UID, bytes("183e99676bb03c546fa468f51c0cbd49"))
  • EMF key : Data partition encryption key. Also called "media key". Stored encrypted by key 0x89B
  • DKey : NSProtectionNone class key. Used to wrap file keys for "always accessible" files on the data partition in iOS 4. Stored wrapped by key 0x835
  • BAG1 key : System keybag payload key (+initialization vector). Stored unencrypted in effaceable area.
  • Passcode key : Computed from user passcode or escrow keybag BagKey using Apple custom derivation function. Used to unwrap class keys from system/escrow keybags. Erased from memory as soon as the keybag keys are unwrapped.
  • Filesystem key (f65dae950e906c42b254cc58fc78eece) : used to encrypt the partition table and system partition (referred to as "NAND key" on the diagram)
  • Metadata key (92a742ab08c969bf006c9412d3cc79a5) : encrypts NAND metadata


iOS 3 and below

16-byte IV - AES128(key835, IV, data + SHA1(data))

iOS 4

version (0)|protection_class - AESWRAP(class_key, item_key) (40 bytes)|AES256(item_key, data)

iOS 5

version (2) protection_class len_wrapped_key AESWRAP(class_key, item_key) (len_wrapped_key) AES256_GCM(item_key, data) integrity_tag (16 bytes)

Keychain tools


  1. https://github.com/ptoomey3/Keychain-Dumper/blob/master/main.m
  2. https://code.google.com/p/iphone-dataprotection/downloads/detail?name=keychain_dump


Notes

In the recent versions of iOS (4 & 5), by default, the keychain items are stored using the kSecAttrAccessibleWhenUnlocked data protection accessibility constant. However the data protection is effective only with a device passcode, which implies that sensitive data stored in the keychain is secure only when a user sets a complex passcode for the device. But iOS applications cannot enforce the user to set a device passcode. So if iOS applications rely only on the Apple provided security they can be broken if iOS security is broken.

Epiloge

iOS application security can be improved by understanding the shortcomings of the current implementation and writing one’s own implementation that works better. In the case of the keychain, iOS application security can be improved by using the custom encryption (using built-in crypto API) along with the data protection API while adding the keychain entries. If custom encryption is implemented it is recommended to not to store the encryption key on the device.

References:

  1. http://appadvice.com/appnn/tag/privacy-issues
  2. http://resources.infosecinstitute.com/pentesting-iphone-applications-2/
  3. http://cryptocomb.org/Iphone%20UDIDS.pdf
  4. http://en.wikipedia.org/wiki/OpenFeint
  5. http://resources.infosecinstitute.com/iphone-forensics/
  6. http://support.apple.com/kb/HT1766
  7. http://stackoverflow.com/questions/6697247/how-to-create-plist-files-programmatically-in-iphone
  8. http://www.icanlocalize.com/site/tutorials/how-to-translate-plist-files/
  9. http://www.macroplant.com/iexplorer/
  10. http://resources.infosecinstitute.com/iphone-penetration-testing-3/
  11. http://sit.sit.fraunhofer.de/studies/en/sc-iphone-passwords-faq.pdf

The Hackers Guide To Dismantling IPhone (Part 2)

Introduction

 This post is the second part of the series "The Hackers Guide To Dismantling IPhone" and is going to describe how to perform all types of iPhone network attacks on any iPhone. This post is also going to explain how to set up the testing environment for hacking an iPhone also.The iPhone provides developers with a platform to develop two types of applications.

Web based applications – which uses JavaScript, CSS and HTML-5 technologies Native iOS applications- which are developed using Objective-C and Cocoa touch API. This article mainly covers the pen testing methodology of native iOS applications. However, some of the techniques explained here can also be used with web-based iOS applications.

A simulator does not provide the actual device environment, so all the penetration testing techniques explained in this article are specific to a physical device. iPhone 4 with iOS 5 (maybe iOS6) will be used for the following demonstrations.

To perform pentesting we need to install a few tools on our device. These tools are not approved by Apple. Code signing restrictions in iOS do not allow us to install the required tools on the device. To bypass the code signing restrictions and run our tools we have to JailBreak the iPhone. JailBreaking gives us full access to the device and allows us to run code which is not signed by Apple. After JailBreaking, the required unsigned applications can be downloaded from Cydia.

Setting Up the testing environment

In order to set up a descent testing environment you would have to:

  1. Have at your disposal a wireless network that does not have enabled the wireless isolation feature (wireless isolation does not allow communication between hosts, within the same wireless network). If you use an iDevice to set up your testing network then you are screwed since as far as I know iDevice wireless hotspots (e.g. iPhone tethering etc.) have by default that feature enabled.
  2. You would have to configure the proxy with in your iDevice to traffic through a Web Proxy (for this post I am going to use free version of Burp Proxy v1.5).
From Cydia, download and install the applications listed below:
  • OpenSSH – Allows us to connect to the iPhone remotely over SSH
  • Adv-cmds : Comes with a set of process commands like ps, kill, finger…
  • Sqlite3 : Sqlite database client
  • GNU Debugger: For run time analysis & reverse engineering
  • Syslogd : To view iPhone logs
  • Veency: Allows to view the phone on the workstation with the help of veency client
  • Tcpdump: To capture network traffic on phone
  • com.ericasadun.utlities: plutil to view property list files
  • Grep: For searching
  • Odcctools: otool – object file displaying tool
  • Crackulous: Decrypt iPhone apps
  • Hackulous: To install decrypted apps
iPhone does not give us a terminal to see inside directories. Upon OpenSSH installation on the device, we can connect to the SSH server on the phone from any SSH client (ex:Putty, CyberDuck, WinScp). This gives us flexibility to browse through folders and execute commands on the iPhone. An iPhone has two users by default. One is mobile and the other is a root user. All the applications installed on the phone run with mobile user privileges. But using SSH we can log into the iPhone as a root user, which will give us full access to the device. The default password for both the user accounts (root, mobile) is alpine.

Performing our first Man In The Middle attack

In order for you to start capturing non SSL traffic you would have to change the settings in your iPhone, in order for you to do that you would have to follow the steps below.

Step 1: Go Settings -> WiFi.

Step 2: HTTP Proxy -> Manual.


Step 3: Set the proxy IP equal to the IP that the Burp Proxy is running.


Note: Check out that the Authentication is disabled (we would not want to try to authenticate to our own web proxy).

Step 4: Open Burp -> Proxy Tab


Step 5: Proxy Tab -> Options -> Set the listening IP to the one that is visible to the wireless.


Step 6: Proxy Tab -> Set the proxy to invisible and make sure it is in a running state.


Note: By doing this you will be able to capture all none encrypted traffic. A more realistic scenario would include an ARP poisoning attack first (you should know though that wireless access points nowadays incorporate anti-ARP poisoning countermeasure).  Obviously the counter measures have to be defeated.

HTTPS stripping attacks to SSL traffic

Another type of MITM (Man In The Middle) Attack is in encrypted connections (e.g. connections using SSL/TLS etc.). This attack can be performed after a successful ARP poisoning attack, also this type of attack is obviously much more interesting since, it incorporates sensitive data (e.g. credit cards, user names and passwords etc.). The most "easy" way for performing this attack is by using SSLStrip.

Note: SSLStrip is used to perform HTTPS stripping attacks (presented officially for first time at Black Hat DC 2009). SSLStrip will transparently hijack HTTP traffic on a network. The free Burp Suit Proxy Edition 1.5 version and above supports SSLStrip functionality.

The options shown in the picture below may be used to deliver sslstrip-like attacks:

Step 1: Proxy -> Options -> Response Modification


Note: Obviously you can play around with the response modification menu and see how does the client behave with sslstrip-like attack scenario and also with the remove secure flag from cookies. This type of attack is more of a user-oriented attack than an actual technical attack on SSL. It doesn't break the underlying cryptography or trust model. Another way to perform a Man In The Middle attack would be to use the sslsniff tool created by the same guy that wrote sslstrip (Moxie Marlinspike).

This can be defeated by using the HTTP Strict Transport Security (HSTS). The threats addressed  by this http flag are:

1. Passive Network Attackers

The HSTS forces SSL, access using end-to-end secure transport (mixed content is allowed without HSTS). It fixes issues that have to do with web sites that only encrypt the login process and not the cookie(s) created during the login process (the secure flag does not protect from mixing encrypted with non encrypted content).

Note: Tools used to perform the attack: firesheep - http://codebutler.com/firesheep/

2. Active Network Attackers

A determined attacker can mount an active attack, either by impersonating a user's  DNS server or, in a wireless network, by spoofing network frames or offering a similarly  named evil twin access point.  If the user is behind a wireless home router, an attacker can attempt to reconfigure the router using default
passwords and other vulnerabilities.  Some sites, such as banks, rely on end-to-end secure transport to protect themselves and their users from such active attackers.  Unfortunately, browsers allow their
users to easily opt out of these protections in order to be usable

Performing ARP Poisoning to your iPhone (not so easy)

The best possible to perform your MITM attack is by using mature and well tested tools such as Ettercap.  Ettercap is a comprehensive suite for man in the middle attacks. It features sniffing of live connections, content filtering on the fly and many other interesting tricks. It supports active and passive dissection of many protocols and includes many features for network and host analysis.

Step 1: Open a terminal as root and type Ettercap -G then scan for host. In this wireless network the identified hosts are shown below:


Step 2: Alter the traffic in such a way so as to exploit the device. Here is an example ettercap filter that changes on the fly the traffic:

if (ip.proto == TCP && tcp.dst == 80) {
   if (search(DATA.data, "Accept-Encoding")) {
      replace("Accept-Encoding", "Accept-Rubbish!"); 
	  # note: replacement string is same length as original string
      msg("zapped Accept-Encoding!\n");
   }
}
if (ip.proto == TCP && tcp.src == 80) {
   replace("img src=", "img src=\"http://www.irongeek.com/images/jollypwn.png\" ");
   replace("IMG SRC=", "img src=\"http://www.irongeek.com/images/jollypwn.png\" ");
   msg("Filter Ran.\n");
}

The code should be pretty self explanatory. The # symbols are comments. The "if" statement tells the filter to only work on TCP packet from source port 80, in other words coming from a web server. This test may still miss some images, but should get most of them. I'm also not sure about Ettercap's order of operation with AND (&&) and OR (||) statements but this filter largely seems to work (I tried using parentheses to explicitly specify the order of operation with the Boolean operators but this gave me compile errors).  The "replace" function replaces the first parameter string with the second.  Because of the way this string replacement works it will try to mangled image tags and insert the picture we desire into the web page's HTML before it returns it to the victim. The tags may end up looking something like the following:

                <img src="http://www.irongeek.com/images/jollypwn.png" /images/original-image.jpg>

Note: The original image location will still be in the tag, but most web browsers should see it as a useless parameter. The "msg" function just prints to the screen letting us know that the filter has fired off.

Now that we sort of understand the basics of the filter lets compile it. Take the ig.filter source code listed above and paste it into a text file, then compile the filter into a .ef file using the following command:

            etterfilter ig.filter -o ig.ef

Note: This type of attack applies to all type of devices, but now-days is most important for mobile devices.

Performing an attack by setting up a rogue access point 

Airsnarf is a simple rogue wireless access point setup utility designed to demonstrate how a rogue AP can steal usernames and passwords from public wireless hotspots.  Airsnarf was developed and released to demonstrate an inherent vulnerability of public 802.11b hotspots--snarfing usernames and passwords by confusing users with DNS and HTTP redirects from a competing AP.

In response to the threat posed by rogue access points, we've also developed a hot spot defense kit to assist users in detecting wireless attackers. HotSpotDK checks for changes in ESSID, MAC address of the access point, MAC address of the default gateway, and radical signal strength fluctuations. Upon detecting a problem, HotSpotDK notifies the user that an attacker may be on the wireless network. Currently HotSpotDK runs on Mac OS X and Windows XP.

Airsnarf has been tested with (i.e. probably requires) the following:


  • Red Hat Linux 9.0 - http://www.redhat.com/
  • kernel-2.4.20-13.9.HOSTAP.i686.rpm - http://www.cat.pdx.edu/~baera/redhat_hostap/
  • iptables - Red Hat 9.0 CD 1
  • httpd - Red Hat 9.0 CD 1
  • dhcp - Red Hat 9.0 CD 2
  • sendmail - Red Hat 9.0 CD 1
  • Net::DNS Perl module - http://www.cpan.org/


Install & run Airsnarf with the following commands:

tar zxvf airsnarf-0.2.tar.gz
cd ./airsnarf-0.2
./airsnarf

How does it work?  Basically, it's just a shell script that uses the above software to create a competing hotspot complete with a captive portal.  Variables such as local network, gateway, and SSID to assume can be configured within the ./cfg/airsnarf.cfg file.  Optionally, as a command line argument to Airsnarf, you may specify a directory that contains your own airsnarf.cfg, html, and cgi-bin.  Wireless clients that associate to your Airsnarf access point receive an IP, DNS, and gateway from you--just as they would any other hotspot.  Users will have all of their DNS queries resolve to your IP, regardless of their DNS settings, so any website they attempt to visit will bring up the Airsnarf "splash page", requesting a username and password.  The username and password entered  by unsuspecting users will be mailed to root@localhost.  The reason this works is 1) legitimate access points can be impersonated and/or drowned out by rogue access points and 2) users without a means to validate the authenticity of access points will nevertheless give up their hotspot credentials when asked for them.

So what's the big deal?  Well, with a setup like Airsnarf one can obviously create a "replica website" of many popular, nationally recognized, "pay to play" hotspots.  That's as simple as replacing the index.html file Airsnarf uses with your own custom webpage that still points its form field variables to the airsnarf.cgi.  Combined with sitting at or near a real hotspot, hotspot users will associate and unknowingly give out their username and password for the hotspot provider's network.  The usernames and passwords can then be misused at will to utilize other hotspots of the same provider, possibly anywhere in the nation, leaving the original duped user to pay the bill.  Should the user be charged per minute usage, they may recognize something is terribly wrong when they get their next bill.  If the user pays a flat rate for unlimited usage, the user may never realize their credentials have been captured and are being misused.


Wireless hotspot operators should consider the following:  stronger authentication mechanisms, one-time authentication setups, monitoring the existence and creation of APs, and perhaps just giving away hotspot access for free to remove any user service theft risks.

To Be Continued...

References:
  1. http://en.wikipedia.org/wiki/Wireless_security
  2. http://www.kimiushida.com/bitsandpieces/articles/attacking_ssl_with_sslsniff_and_null_prefixes/index.html 
  3. http://www.thoughtcrime.org/software/sslsniff/ 
  4. http://monkey.org/~dugsong/dsniff/ 
  5. http://ettercap.github.com/ettercap/
  6. http://www.irongeek.com/i.php?page=security/ettercapfilter
  7. http://codebutler.com/firesheep/
  8. http://tools.ietf.org/html/rfc6797#section-2.3.1
  9. http://resources.infosecinstitute.com/pentesting-iphone-applications/ 
  10. http://airsnarf.shmoo.com/

09/03/2013

The Hackers Guide To Dismantling IPhone (Part 1)


Introduction

Hello everybody, it has been a while since I made a post, but this time is going to be a really long long post (that is why I am going to brake it in many parts). Lately my interest has significantly increased as far as the iOS platform is concerned.  The iOS is becoming more and more popular among the financial business sector companies so it came for me the time to expand my knowledge on IPhone devices. Plus since the complete industrialization of hacking (mostly because of the Chinese government, unit something is doing a good job) nowadays knowledge in iOS platforms is critical (they pay good money for iHacking). This post is going to include only hardening information and explain what the security measures are to block exploits and prevent buffer overflows etc. The second post is going to include network attacks and the third post is going to include attacks in the data of an iDevice.


Note: iOS the most advanced OS for mobile devices ever created (just kidding, I love Apple).

This blog post is going to focus on how to perform a complete penetration test on an iOS application, no time is going to be wasted on how to pentest the server component since the threat land scape is almost identical to that of a Web Application or a Web Service, and since you read my blog (if you don't start doing it) you should know by now that I covered most types of attacks for Web Applications and Web Services so far.

The iOS history

Since the release of the original iPhone in 2007, Apple has engaged in a cat-and-mouse game with hackers to secure their suite of devices for what has grown to nearly 100 million end users. Over this time, many improvements have been made to the security of the iOS, and the stakes have been raised by their introduction into circles with far greater security requirements.

What iOS is

iOS is Apple's mobile operating system, which is derived from Mac OS X, with which it shares the Darwin foundation, and is therefore a Unix-like operating system. Being developed originally for the iPhone, it then has been used on the iPod Touch, iPad and Apple TV as well. So in this article the iOS term specifically refers to the mini-operation system that run on all the iDevices (iPhone, iPod, iPad and Apple TV. In this little apple operation system, there are four abstraction layers: the Core OS layer, the Core Services layer, the Media layer, and the Cocoa Touch layer, which in total will roughly use 500 megabytes of the devices storage.


Note: The Core OS layer is written in C, while the higher layers that runs all interesting applications is written in Objective-C. The higher layer is the most interesting as far as the attacks are concerned.

For security and commercial reasons and considerations, Apple does not permit the OS to run on third- party hardware and also has a limitation on the usage of iOS on these iDevices. Therefore iOS has been subject to a variety of different hacking methods focusing on attaching functionality not supported by Apple. This hacking procedure is called iOS Jailbreak.

The iOS security architecture

While Apple was designing iOS operating system decided to increase the security by using various "tricks", (obviously iOS is based on the same core technologies as OS X) to reduce the attack surface. The attack surface is the code that processes attacker supplied input (e.g. SMS messages, Safari Web Pages etc.).  One of the many ways it did that was by not including various software packages in iOS (e.g. Java and Flash are unavailable). This automatically translates to iOS not processing Java and Flash input (Java and Flash have a history of security vulnerabilities). Another trick that Apple did to reduce the attack surface was to striped off part the functionality provided by the default software that comes installed with the iOS (e.g. Mobile Safari does not support some Adobe features).  Also the iOS OS was also stripped off from many applications compared to OS X e.g. the /bin/sh software is not included in iOS, which translates that if you write an exploit for iOS you would have to implant your own shell to your exploit, which means that your exploit would have to increase its size etc.

More on iOS security

Some of the core security features referenced per layer are: 
  • System architecture: The secure platform and hardware foundations of iPhone, iPad, and iPod touch.
  • Encryption and Data Protection: The architecture and design that protects the user’s data when the device is lost or stolen, or when an unauthorized person attempts to use or modify it.
  • Network security: Industry-standard networking protocols that provide secure authentication and encryption of data in transmission.
  • Device access: Methods that prevent unauthorized use of the device and enable it to be remotely wiped if lost or stolen.
Layered security mechanisms allow for the validation of activities across all layers of the device. From initial boot-up to iOS software installation and through to third-party apps, each step is analyzed and vetted to ensure that each activity is trusted and uses resources properly.

The following picture shows the security model of iOS, as described from above:


Note: Check out that the Apple root certificate installed in the iDevice ROM. Also that iDevices contain their own hardware crypto engines (impressive ee?). Once the system is running, this integrated security architecture depends on the integrity and trustworthiness of XNU (the iOS kernel). XNU enforces security features at run-time and is essential to being able to trust higher-level functions and apps.

More More on iOS security

Apple takes security very seriously and this is obvious from the security controls that are enforced during the execution of third party applications and iOS default pre-installed applications. The security controls explained here is required knowledge to understand how to pentest an iDevice and to later on set the threat landscape. The iOS OS basically enforces Mandatory Access Control (MAC) using the  security controls explained below.

The security controls enforced are listed below:

Least Privilege Principle: System files and resources are also shielded from the user’s apps. The majority of iOS runs as the non-privileged user "mobile", as do all third-party apps. The entire OS partition is mounted read-only. Unnecessary tools, such as remote login services, aren’t included in the system software, and APIs do not allow apps to escalate their own privileges to modify other apps or iOS itself.

Access by third-party apps to user information and features such as iCloud is controlled using declared entitlements. Entitlements are key/value pairs that are signed in to an app and allow authentication beyond run-time factors like unix user ID. Since entitlements are digitally signed, they cannot be changed. Entitlements are used extensively by system apps and daemons to perform specific privileged operations that would otherwise require the process to run as root. This greatly reduces the potential for privilege escalation by a compromised system application or daemon. 

Code Signing: To ensure that all apps come from a known and approved source and have not been tampered with, iOS requires that all executable code be signed using an Apple-issued certificate. Now given that individual developers need to test out their applications on iDevices and enterprises need to distribute apps just to their devices, there is a need to run apps without being signed by Apple. The method to allow this is called provisioning. An individual developer, a company, an enterprise or a university may sign up for one or more of the programs offered by Apple for this reason, in order to enable signing their code.

As part of the program, each developer generates a certificate request for a development and a distribution certificate from a set of private keys generated locally (e.g. by using openssl or a local certificate authority etc.). Apple then replies back with these two certificates. For more information see iOS developer program link.

Through the iOS developer portal then you can generate a provisioning profile. A provisioning profile is nothing more than a .plist file signed by Apple. The .plist file all is doing is list certificates, devices and entitlements (entitlement are configuration files describing what an app is allowed and not allowed to do). When this provisioning profile is installed (e,g, through the IPhone Configuration Utility or a third party Mobile Device Management software). 

The  developer provisioning profile can be used only for 100 devices (the devices listed have to be specific), while the enterprise provisioning does not have that limitation. Essentially provisioning adds accountability to all the apps that are allowed to be installed to an iDevice. 

The following screenshot shows the IPhone Configuration Utility:


Note:  This is obviously is not a signed profile, configured locally from my IPhone Configuration Utility.

The following picture show an enterprise configuration installed and how it shows through the iPhone configuration:


Note: See how the certificate show in the screenshot. This demonstrates the BOMGAR MDM software, that enforces a custom configuration profile.

Sand-boxing: All third-party apps are "sandboxed", so they are restricted from accessing files stored by other apps or from making changes to the device. This prevents apps from gathering or modifying information stored by other apps. Each app has a unique home directory for its files, which is randomly assigned when the app is installed. If a third-party app needs to access information other than its own, it does so only by using application programming interfaces (APIs) and services provided by iOS. The downside of this security model is that same rules apply for all apps (a third party app is not allowed to have more restrictive rules than another).  

Address space layout randomization (ASLR): ASLR protects against the exploitation of memory corruption bugs. Built-in apps use ASLR to ensure that all memory regions are randomized upon launch. Additionally, system shared library locations are randomized at each device start-up. Xcode, the iOS development environment, automatically compiles third-party programs with ASLR support turned on.

NX Flag:  Further protection is provided by iOS using ARM’s Execute Never (XN) feature, which marks memory pages as non-executable. Memory pages marked as both writable and executable can be used only by apps under tightly controlled conditions: The kernel checks for the presence of the Apple-only “dynamic-codesigning” entitlement. Even then, only a single mmap call can be made to request an executable and writable page, which is given a randomized address. Safari uses this functionality for its JavaScript JIT compiler.

Jailbreaking your iOS

Jailbreaking is a process that allows these iDevices users to gain the infamous root access to the command line of the iOS operating system, in order to remove usage and access limitations imposed by Apple. Once jailbroken, iPhone users are able to download extensions and themes that are unavailable through the App Store (via installers such as Cydia) and perform other tasks that are not possible on store-bought devices, including installing non-Apple operating systems such as Linux, running multi-task on old version of iDevices (the new Generation of store-bought devices includes this function). Through the authentication server developed by Aurik (a Ph.d student from UCSB) built up to sign old firmware of iOS, Cydia creator Jay Freeman estimates that over 10% of all iPhones are jailbroken.

Tools you can use for jailbreaking your iPhone are listed alphabetically below (found in theiphonewiki.com):

A
    •    Absinthe
B
    •    Blackra1n
C
    •    Corona
D
    •    Dual Boot Exploit
E
    •    Evasi0n
G
    •    Greenpois0n (jailbreak)
I
    •    IBrickr
    •    ILiberty+
    •    INdependence
J
    •    JailbreakMe
L
    •    Limera1n
M
    •    Mknod
P
    •    Pwnage
    •    PwnageTool
R
    •    Ramdisk Hack
    •    Redsn0w
    •    Redsn0w Lite
    •    Restore Mode
S
    •    Seas0nPass
    •    Sn0wbreeze
    •    Soft Upgrade
    •    Spirit
    •    Star
    •    Symlinks
Z
    •    ZiPhone

Note1: This tutorial was written on 09/March/2013 so an update by performing a research is also required.

Note2: The real question here is do you need to jailbreak your iDevice to pentest it?  The answer is it depends, for example if the app you are testing has anti-jailbreaking countermeasures then maybe no, if the app you are testing has no anti-jailbreaking countermeasures then definitely yes. Jailbreak the the testing target iPhone is must when applicable.

Settings the threat landscape for iOS

What most iOS developers/security consultants do not understand is the threat landscape that is currently associated with the iOS platforms is not clearly defined in their minds, some of them do not even have a clue what is that it should be taken into consideration when performing a Security Assurance, Risk Assessment or Penetration Test to iOS related platform. An iDevice should be treated the thick client on steroids. The features provide from an iOS device are amazing and very rich.

A good source that can be used as a starting point for developing a threat model for iOS should be the OWASP Mobile Security Project found here. The Top 10 Mobile Risks, Release Candidate v1.0 covers pretty much all risks that are associated with an iOS device. The following picture summarizes all risks identified: 


 Note: Risk M2, M5 and M6 are mostly server side related and I am not going to focus on these issue a lot.

Risk M1, M4, M8, M7, M9 and M10 are the most interesting of all the issue and I am going to spend a lot of time analyzing these issues. But before we do that it would be wise to focus a little in the type of interaction an iDevice has with the server component.  Given the nature of the iOS based devices, and their willingness to blindly accept new configuration, hijacking both cellular traffic and WiFi traffic can usually be performed much more easily than a similar attack to a desktop machine. It is so easy, in fact that, that a device's traffic can be hijacked without even compromising the device itself. There are a number of ways to intercept network traffic across local networks; dozens of articles have been written on the subject.  

The following picture shows a typical Web Server iPhone interaction:


Note: This is a simple Web Server, iPhone interaction.

The following pictures shows a typical attack scenarios that can be implemented very easily by exploiting the iPhone configuration of blindly accepting any wireless access points.


The following pictures shows a typical Man In The Middle attack scenarios that can be implemented again very easily due to the nature of the mobile (which by the way are mobile).


Note: The types of attacks that can be performed using the methodology of a rouge access point or the Man In The Middle attack scenarios are going to be explained in the next post.

Epilogue

This article covered the threat land scape for iDevices, which is identical for all mobile devices (e.g. iPhone, iPad, iTouch, iPad mini, Android devices etc.). The next part is going to cover Internet/Wireless attacks and the third is going to cover iDevice data attacks (e.g. attacking unencrypted and encrypted attacks). There might be though a fourth part that sums up all attack patterns together.   

See part 2 

Reference:
  1. Hacking and Securing iOS Applications (1st Edition).
  2. iOS Hacker's Handbook 
  3. http://theiphonewiki.com/wiki/Main_Page
  4. http://www.google.co.uk/url?sa=t&rct=j&q=&esrc=s&source=web&cd=2&ved=0CFgQFjAB&url=http%3A%2F%2Fwww.mcafee.com%2Fuk%2Fresources%2Fwhite-papers%2Ffoundstone%2Fwp-pen-testing-iphone-ipad-apps.pdf&ei=Qao3UdfuIsi0PN_igZgL&usg=AFQjCNEcgkmrLlHGnZAbIqsMAUZo7AV40Q&sig2=SVQsXTDllnOzoSiE0b9xnQ&bvm=bv.43287494,d.ZWU&cad=rja
  5. http://www.google.co.uk/url?sa=t&rct=j&q=&esrc=s&source=web&cd=3&ved=0CEEQFjAC&url=http%3A%2F%2Freverse.put.as%2Fwp-content%2Fuploads%2F2011%2F06%2Fios_jailbreak_analysis.pdf&ei=Lq03UbeEG4vTPICwgZAF&usg=AFQjCNFEFYQasjKS015rXOIscZcD7gt0SQ&sig2=b9zMPuqnxltdEjscnBw9kA&bvm=bv.43287494,d.d2k&cad=rja
  6. http://www.google.com/url?sa=i&rct=j&q=&esrc=s&source=images&cd=&cad=rja&docid=uXJZS5Ygd8EA2M&tbnid=bBuu1xIxavm7BM:&ved=0CAUQjRw&url=http%3A%2F%2Finstitute.mobileappmastery.com%2Fiostrainingpack%2Fios-training-pack-orientation%2F&ei=f_c4Ueq4GMbM0AXHwIH4CA&psig=AFQjCNGXxNtGeXVosrZpTPL02jXebHN5KA&ust=1362774242464377 
  7. http://www.techotopia.com/index.php/Working_with_iOS_6_iPhone_Databases_using_Core_Data 
  8. https://www.owasp.org/index.php/OWASP_Mobile_Security_Project
  9. http://www.google.co.uk/url?sa=t&rct=j&q=&esrc=s&source=web&cd=1&sqi=2&ved=0CDEQFjAA&url=http%3A%2F%2Fimages.apple.com%2Fipad%2Fbusiness%2Fdocs%2FiOS_Security_May12.pdf&ei=E407UZH6Io2o0AXp1oDoDA&usg=AFQjCNEEEm92vnkqK28D_y3D60VtJiYOTg&sig2=go27HN00qxc7oZ3cXgFecw&bvm=bv.43287494,d.d2k&cad=rja 
  10. http://support.apple.com/kb/HT1808 
  11. https://developer.apple.com/programs/ios/ 

AppSec Review for AI-Generated Code

Grepping the Robot: AppSec Review for AI-Generated Code APPSEC CODE REVIEW AI CODE Half the code shipping to production in 2026 has a...